
Creating Surveys
Surveys are one of the most powerful tools in Quali-Fi for collecting quantitative and qualitative data from your audience. This guide walks you through creating effective surveys from start to finish.
Tip
- If you already have a questionnaire in Microsoft Word, you can import it and convert it into a survey using Rhoxi AI. See Creating Surveys with Rhoxi AI.
- For the conversational Rhoxi Research workspace (still in limited-release beta), see Rhoxi Research Agent (Beta).
- To migrate surveys from the previous Q-Fi platform, see Legacy Survey Import.
- To bulk-import survey translations from CSV or Excel, see Importing Survey Translations.
- If you want an end-to-end on-demand workflow (create with Rhoxi, translate, look and feel, payment, deploy), see Creating and Deploying an On-Demand Survey.
- If you are recruiting new members into an insights community, see Creating a Recruitment Survey for an Insights Community.
- If you want an end-to-end example of building a survey manually (including screen-out logic and testing), see Creating a Customer Satisfaction Survey.
- For an overview of key features in the Survey Builder (settings, embedded data, triggers, randomization, templates, and end screens), see Survey Builder Deep Dive.
- To keep a concept, image, or video on screen for every question in a section, see Persistent Content.
- To let respondents email or text themselves a resume link, see Save & Continue Later.
- To customize thank-you, screen-out, quota-full, and already-submitted messages and redirects, see End Survey Screens.
- To define respondent metadata (campaign codes, panel IDs, source tags) and pass values through survey links, see Embedded Data.
- To route multiple panel providers to different exit URLs using panel + panelist ID embedded data, see Multiple Panel Redirects.
- To configure email, SMS, or video interview triggers, see Survey Triggers.
- To append, replace, or delete long option lists, matrix rows, or carousel items in bulk, see Bulk Edit Choice Lists.
- To insert URL, popup, or file links inside question text and labels, see Survey Content Links.
- To monitor fieldwork in real time, see Survey Live Dashboard.
Survey Builder Overview
The Quali-Fi Survey Builder provides a visual, drag-and-drop interface for creating surveys:
Key Components
| Component | Description |
|---|---|
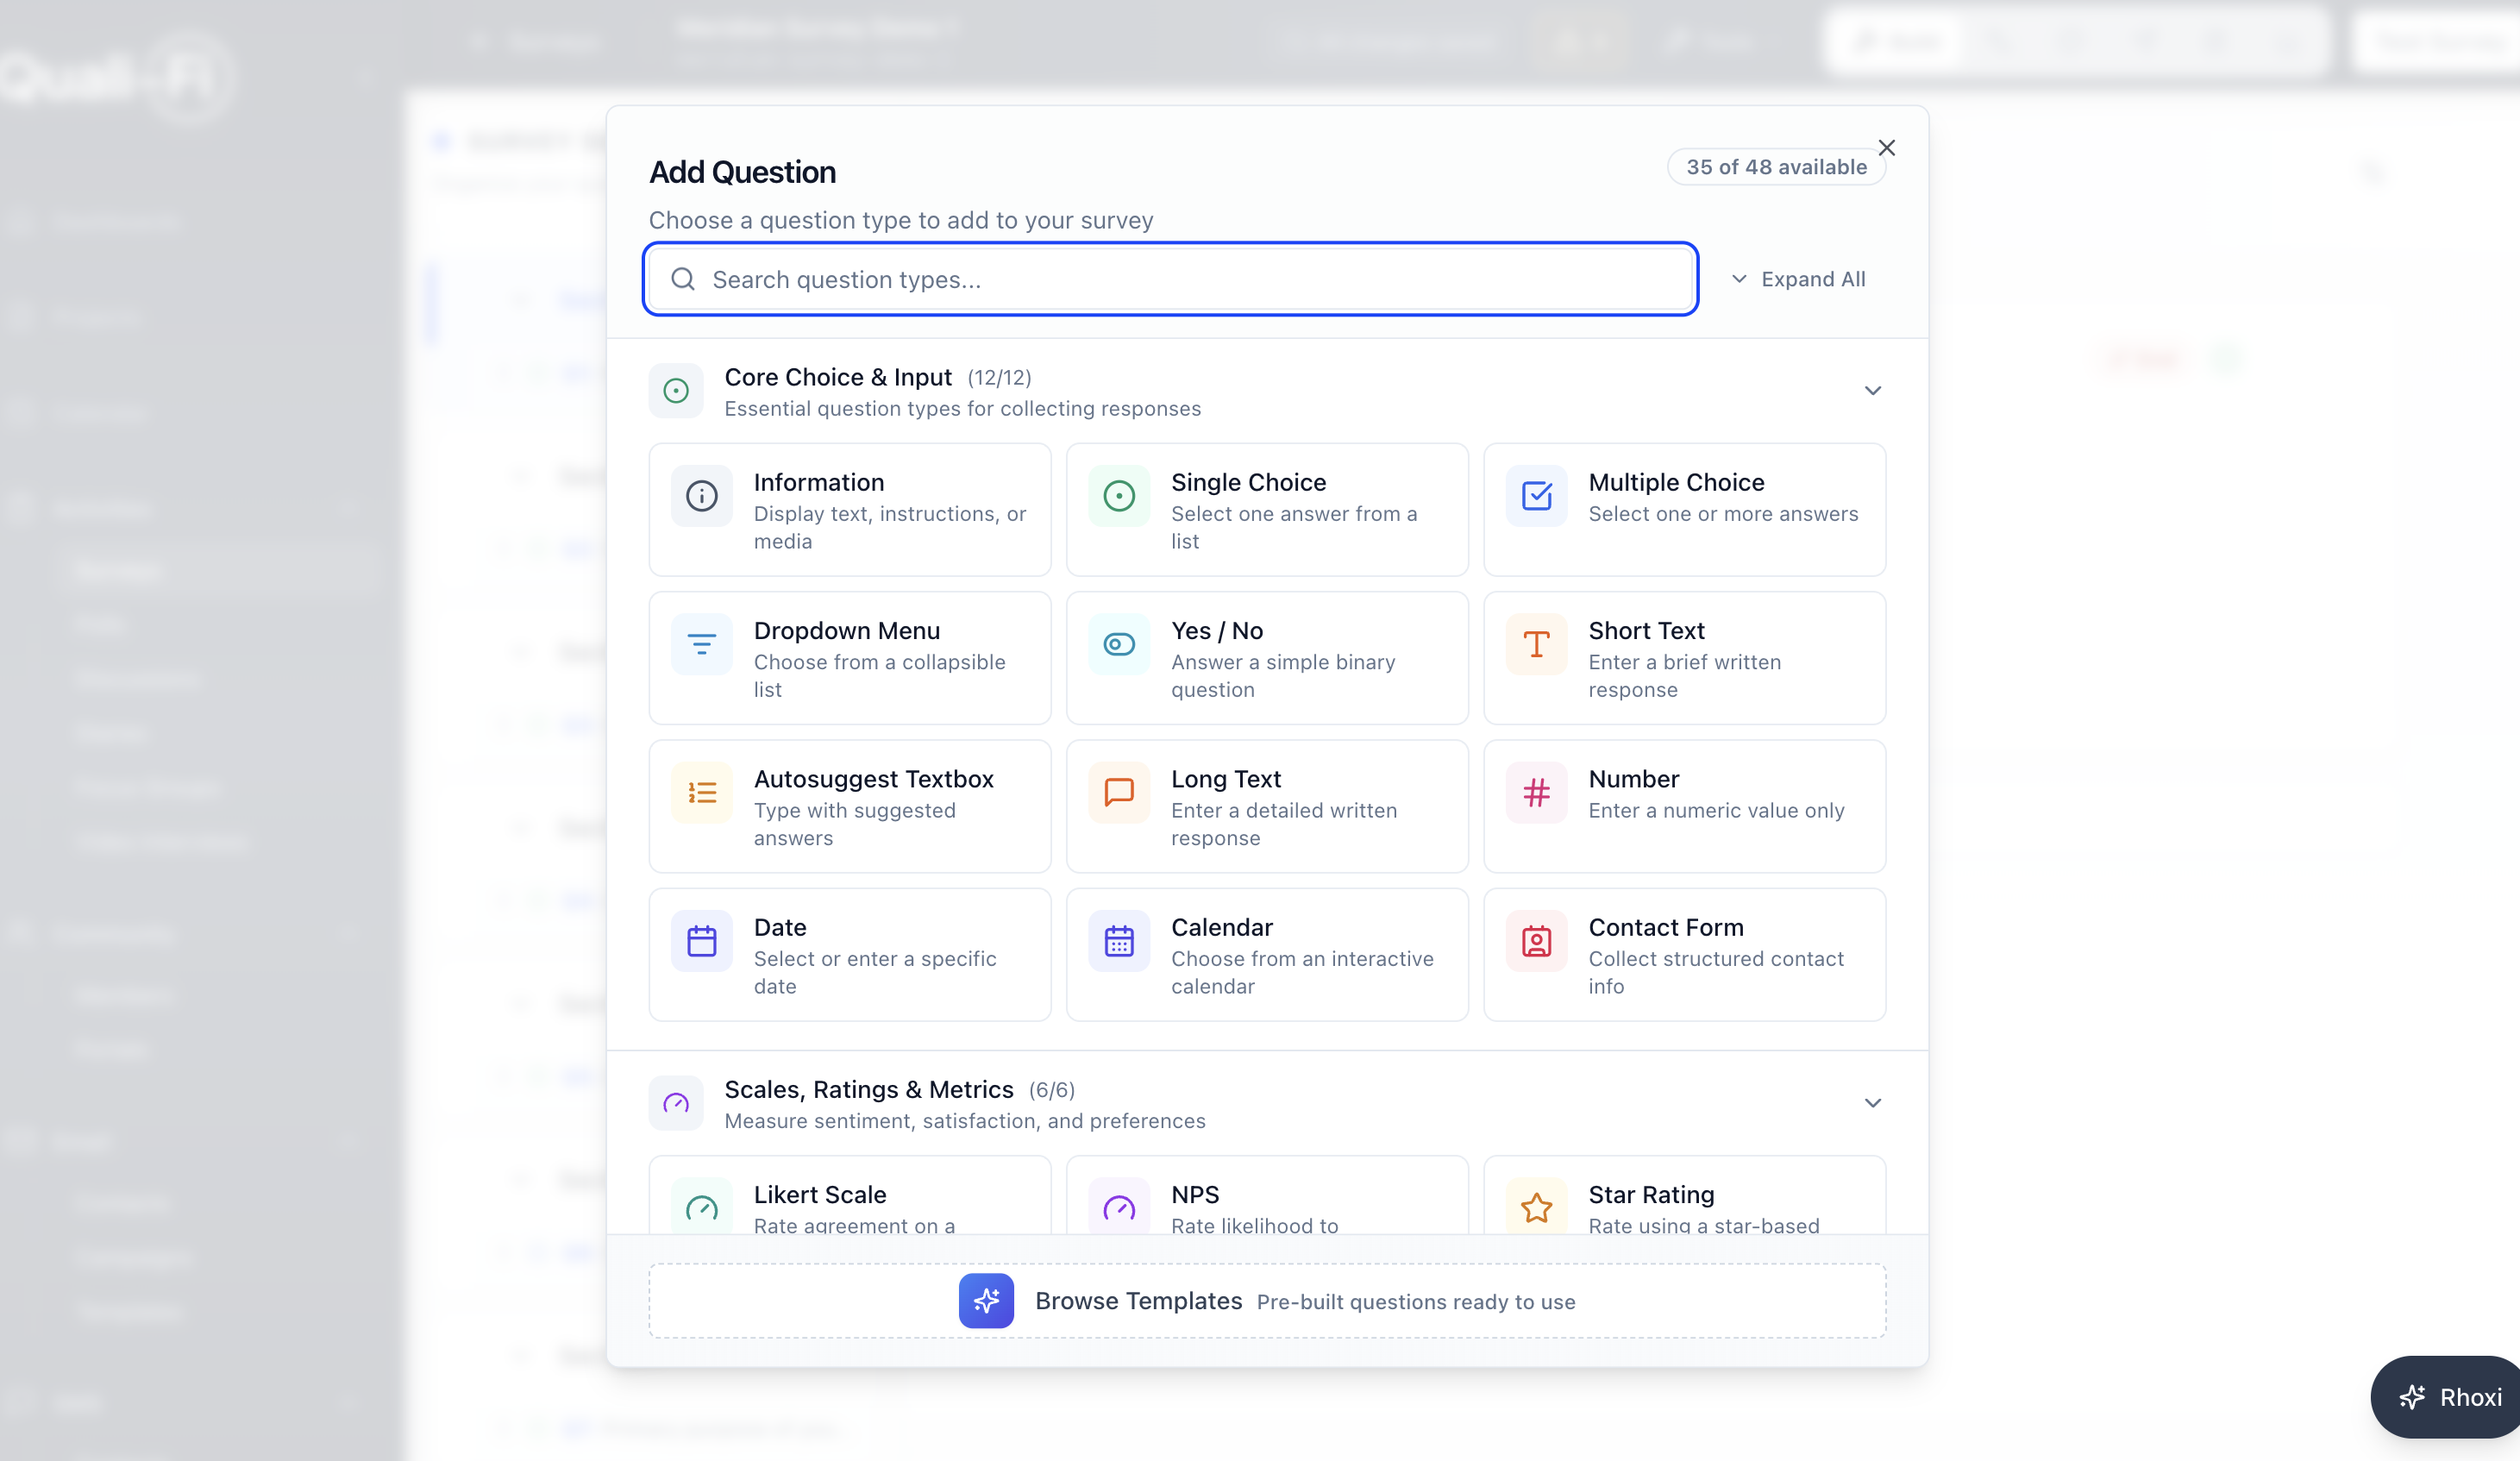
| Question Library | View list of quetion types you can add to your survey |
| Canvas | Drag and drop to rearrange questions or click on question lables to edit |
| Test / Preview View | See how your survey looks to respondents |
| Logic Builder | Add skip logic and branching |
| Settings Panel | Configure survey question and options |
| Tools | Settings, Embedded Data, Triggers, Block Randomization, and Rhoxi AI Simulation |
Creating a New Survey
Open the Surveys Module
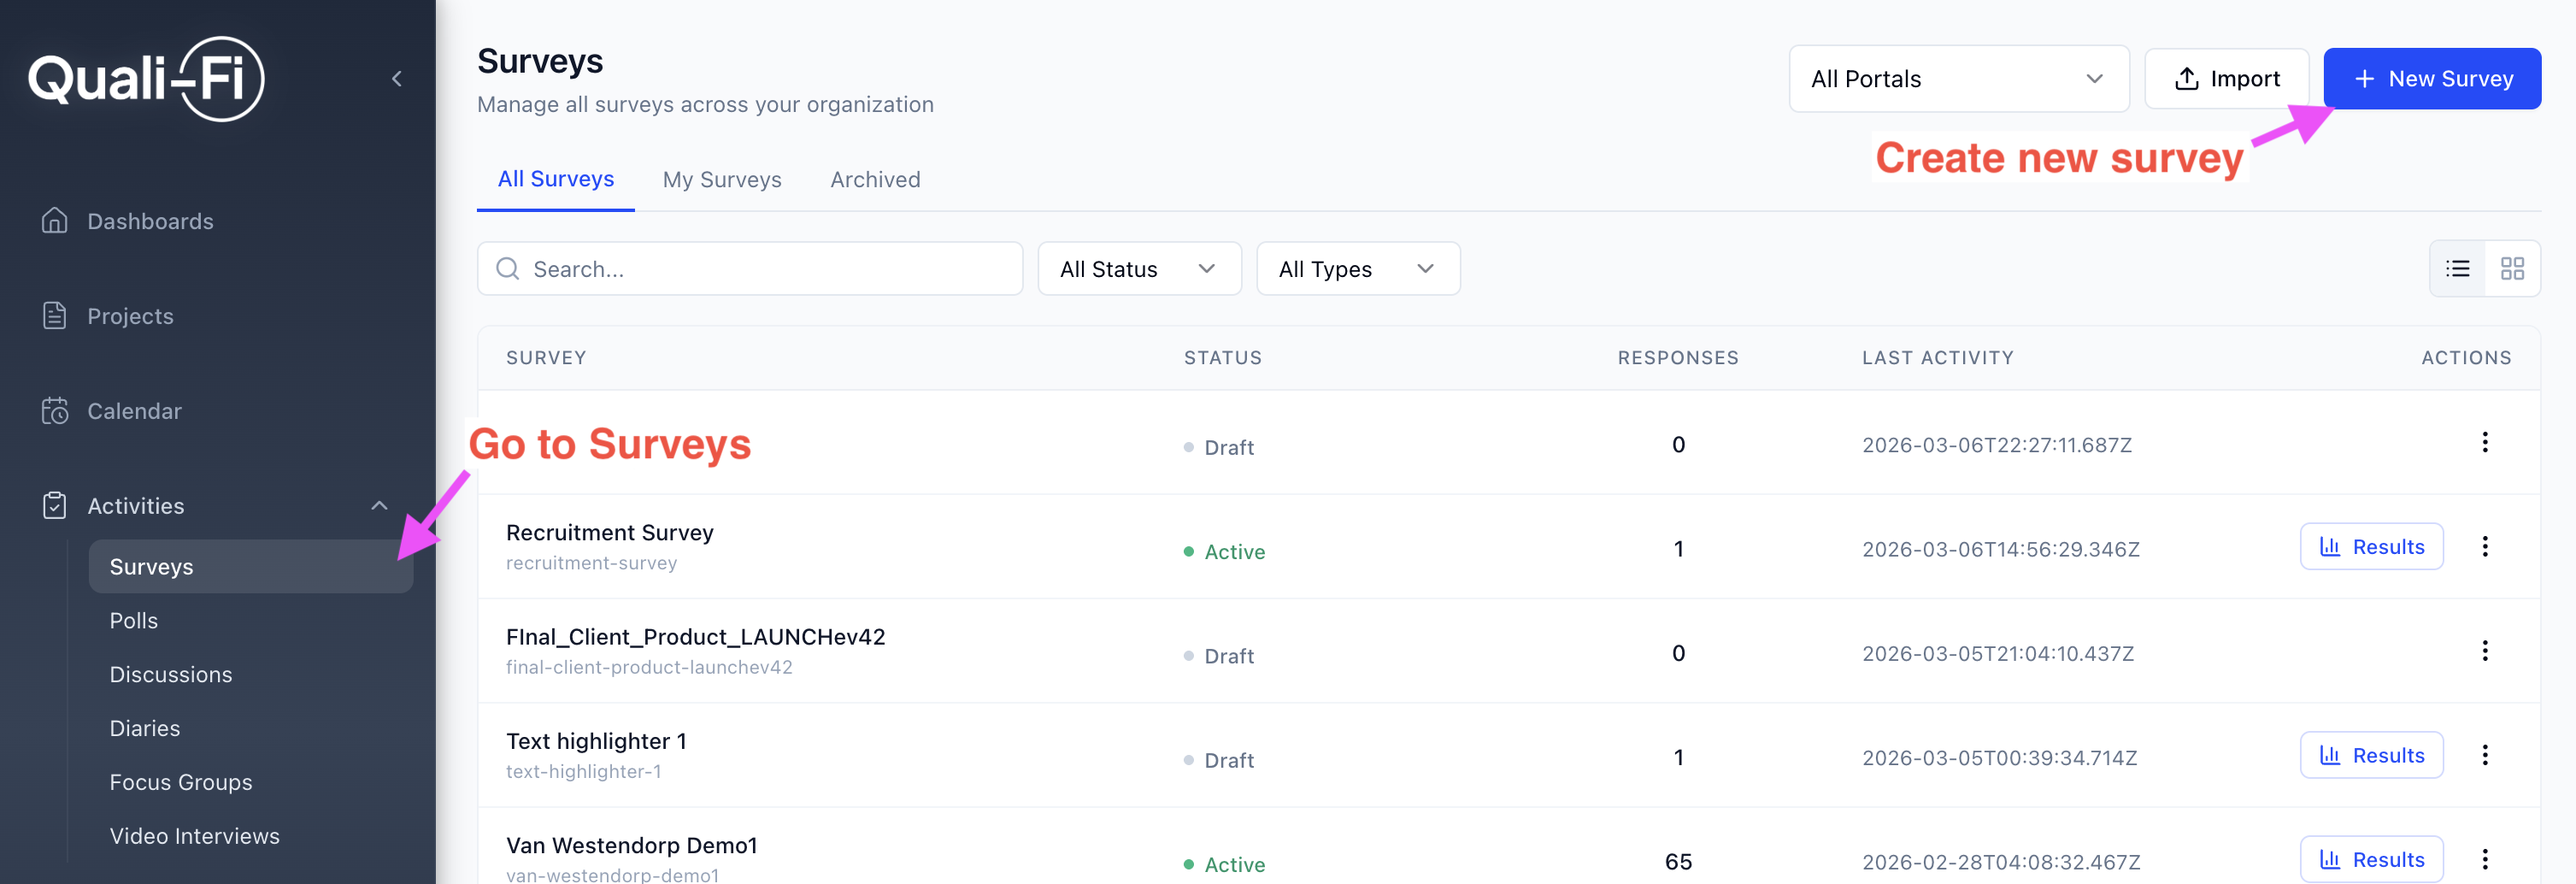
In the left side menu, go to the Activities section and click Surveys.
Click New Survey
Click New Survey to start creating a new survey.
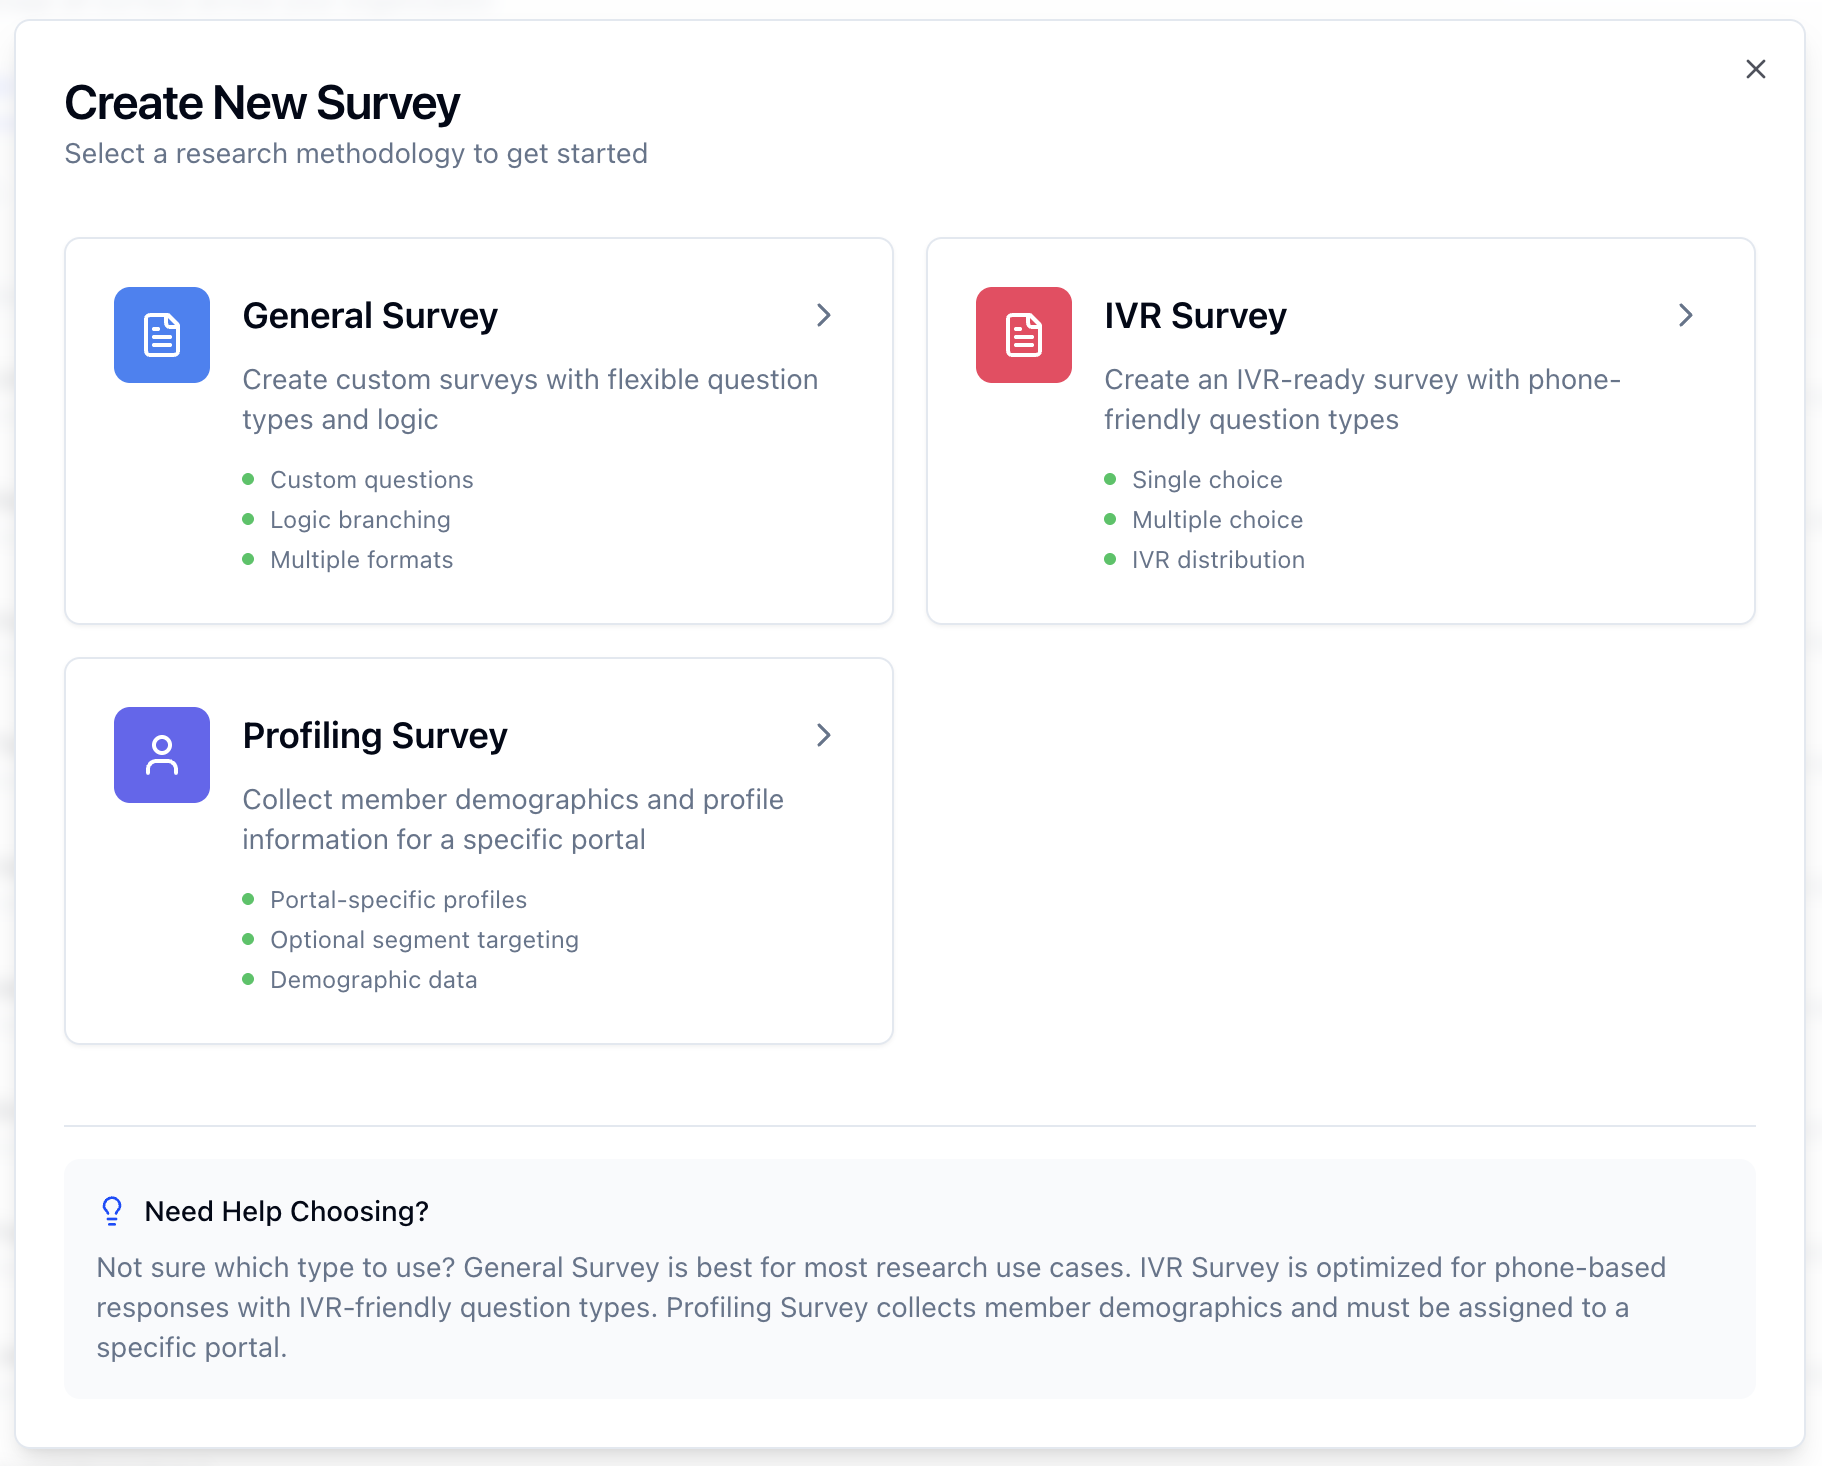
Choose Your Survey Type
Choose the type of survey you are building, or start with a General Survey.
Creation method
Choose the type of survey you are building, or start with a General Survey.
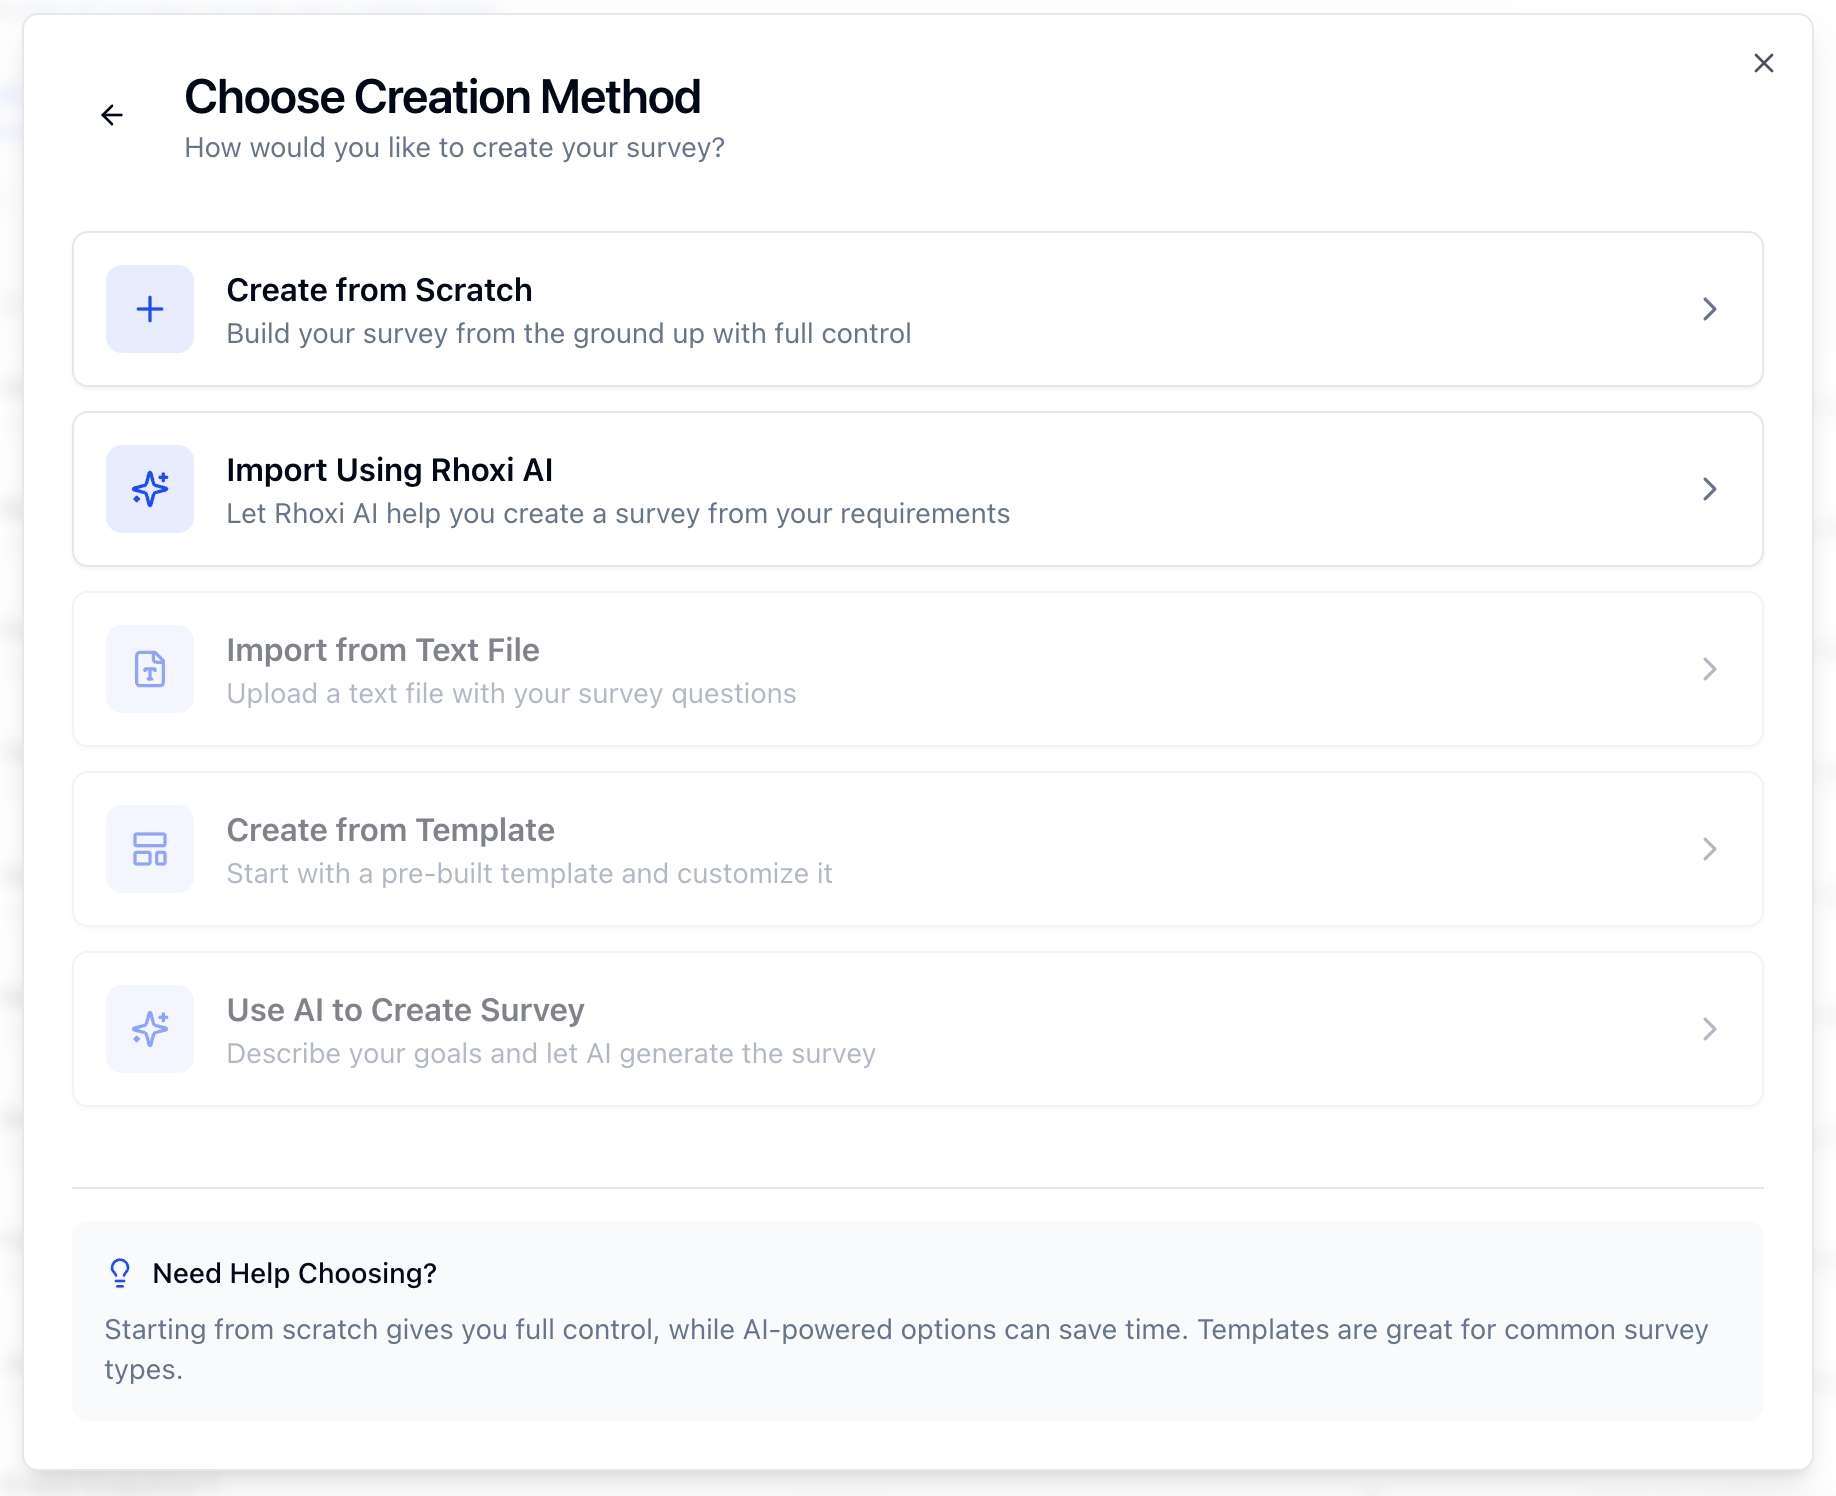
- Create from scratch - use this option to manually create each question in the survey.
- Import using Rhoxi AI - upload a survey created in MS Word and Rhoxi will build it in Quali-Fi.
- Create from Template - start by creating from a prebuilt template
Add Questions to Your Survey
Add questions by clicking on the "+ Add Question" button, then select a question from the quetion library.
Quick Question Types
| Type | Best For |
|---|---|
| Single Choice | Single selection from options |
| Multiple Choice | Multiple selections allowed |
| Rating Scale | 1-5 or 1-10 ratings |
| Matrix | Multiple items rated on same scale |
| Carousel | Evaluate items one at a time |
| Swipe Cards | Swipe or tap to prefer each stimulus |
| Open Text | Free-form text responses |
| NPS | Net Promoter Score (0-10) |
See Question Types for a complete reference.
Question Best Practices
Tip
Keep questions clear and concise. Avoid double-barreled questions that ask about two things at once.
Good Question:
How satisfied are you with our customer support?
Avoid:
How satisfied are you with our customer support and product quality?
Organizing Your Survey
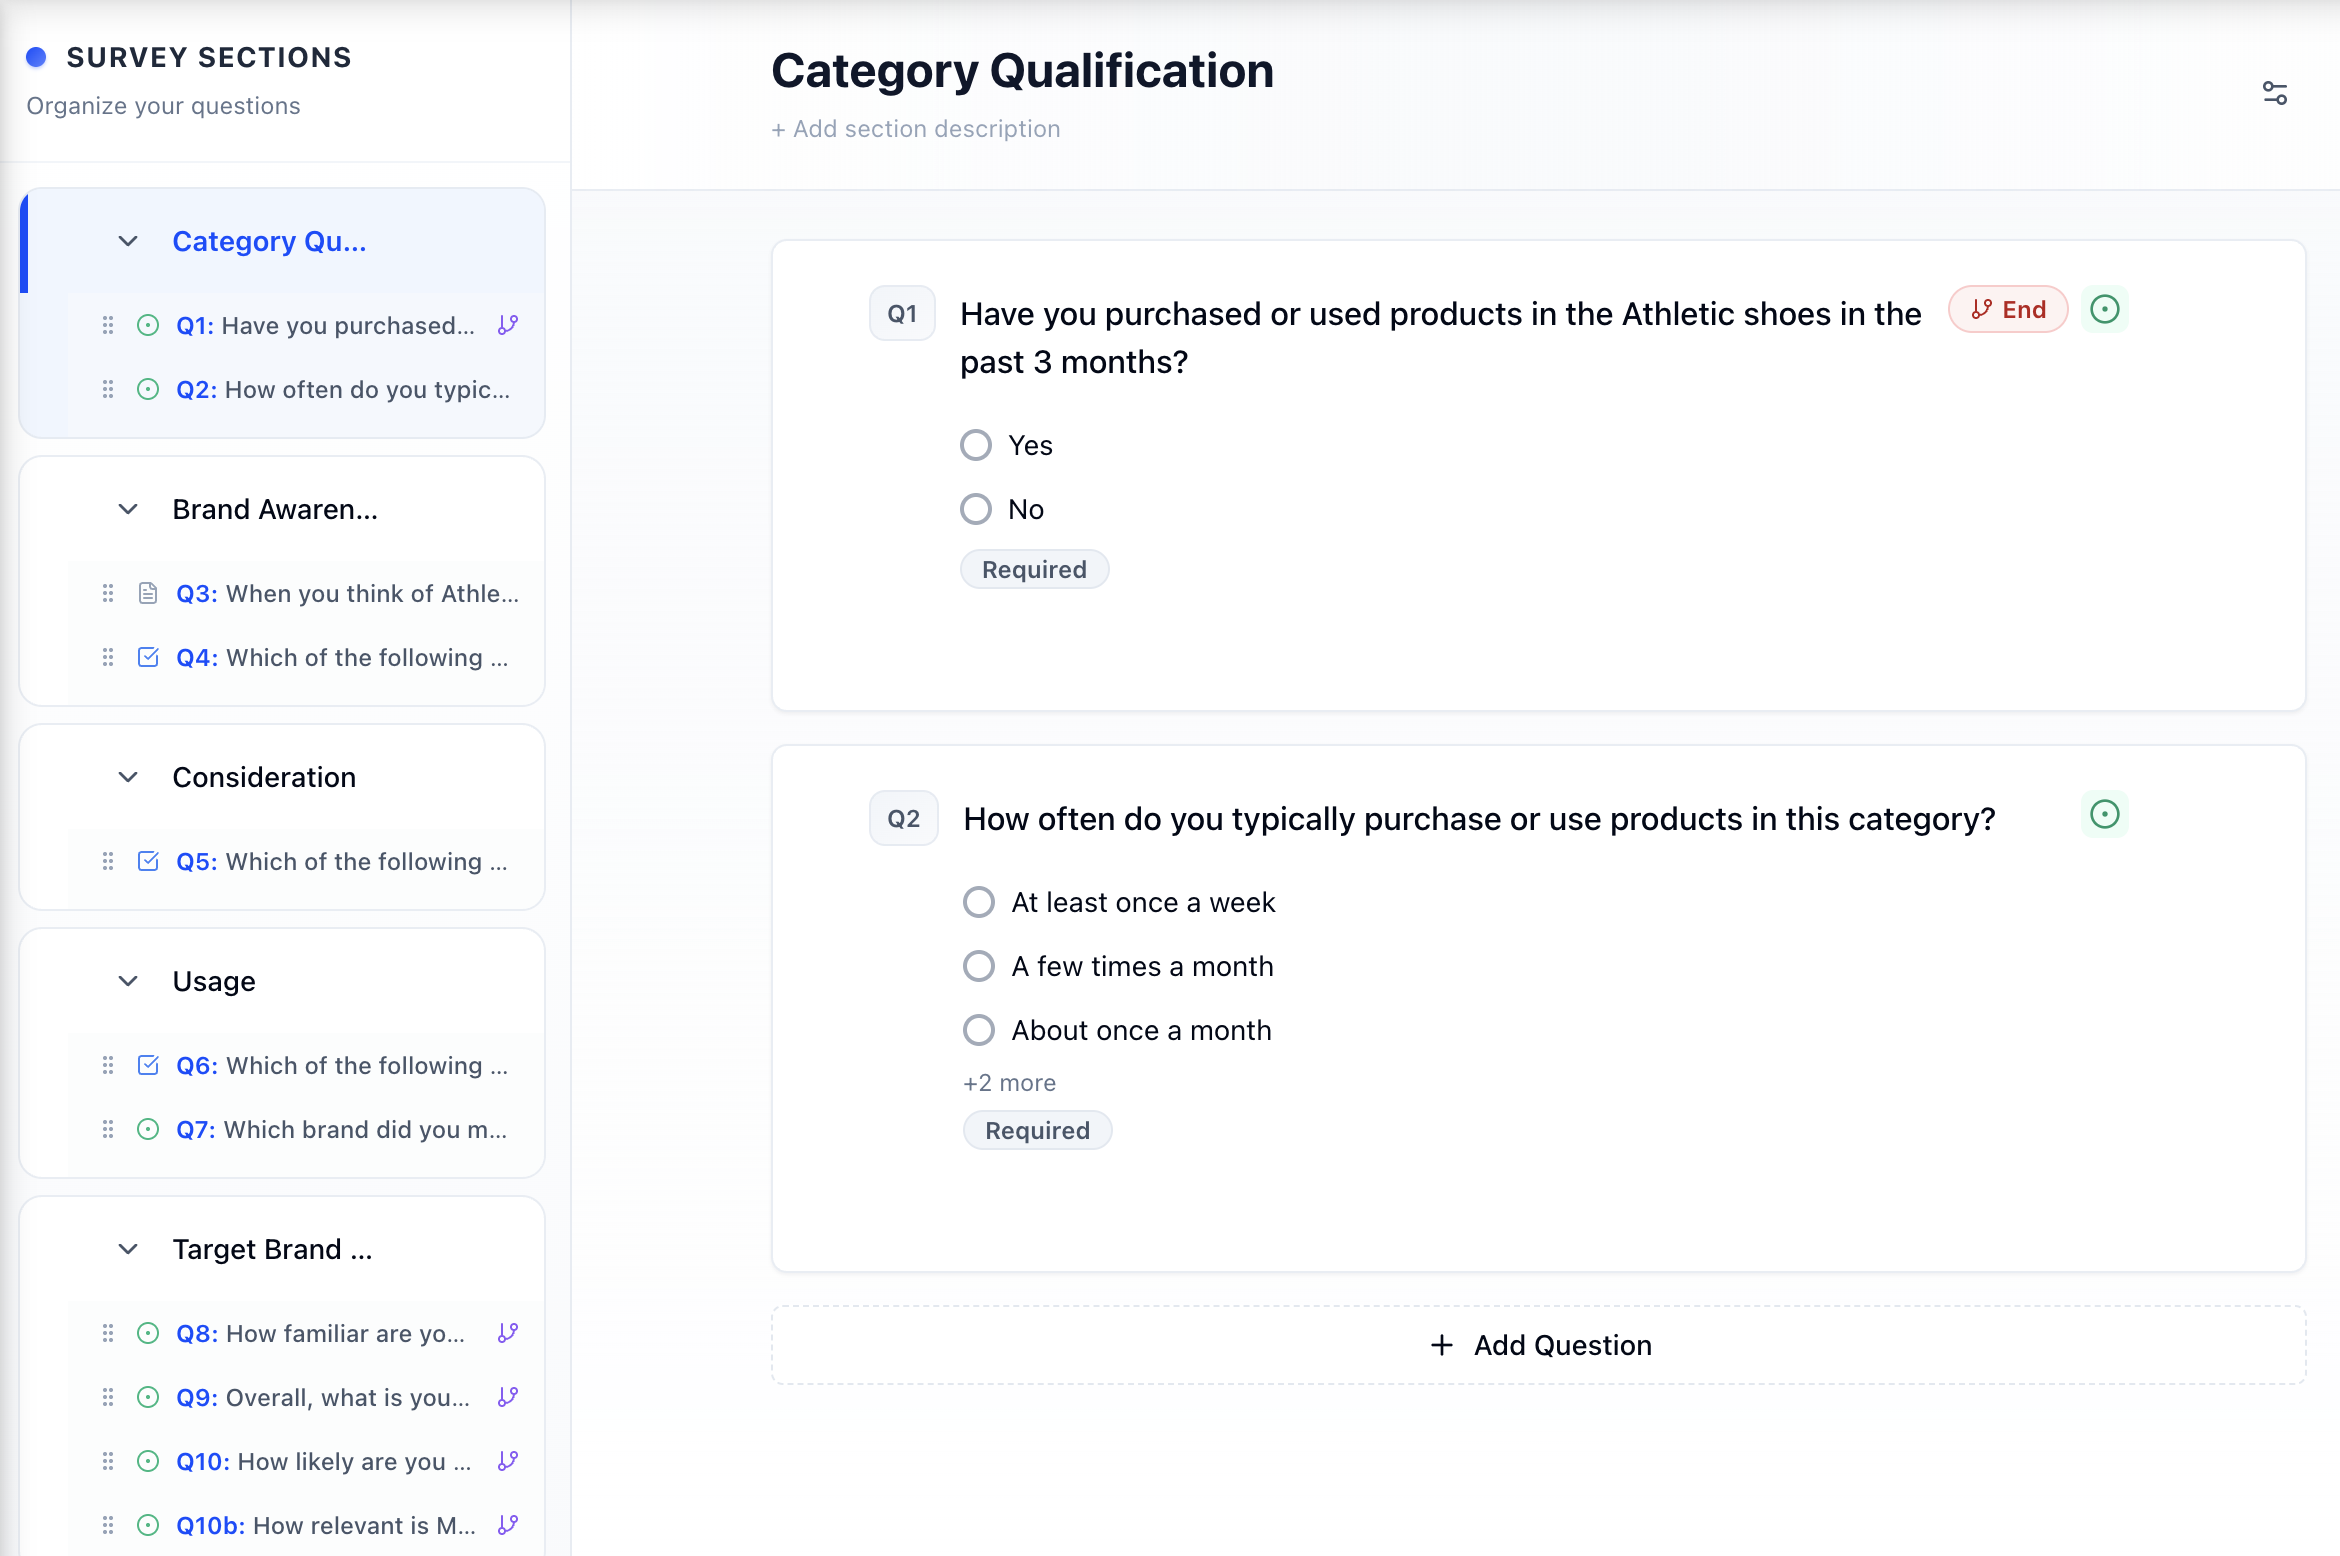
Sections and Page Breaks
Organize long surveys into logical sections:
- Click Add Section in the Survey Sections left side panel
- Name your section (e.g., "Demographics", "Product Feedback")
- Add a short supporting description if respondents need a handoff before the next block of questions — they see title and description at the start of that section
- To keep a stimulus visible for the whole section (image, video, or reference copy), open the section Settings gear and set up Persistent Content
- Drag questions to a different section, or onto another question in the same section to change order
Reordering Questions
The left Survey Sections list is the reliable place to change order.
- Drag a question onto another question in the same section to change its position there.
- Drag a question onto a different section to move it.
- Drag a section handle to reorder sections.
- The canvas also accepts drag-and-drop if you prefer working on the page itself.
Duplicate a question when you want a copy, not a move.
Survey Settings
Open Tools → Survey Settings (or click the survey name) to configure the survey name, description, portal visibility, restricted access, start/end dates, Save & continue later, and related options.
Auto-advance after answer
Turn on Auto-advance after answer when you want eligible single-answer questions to move to the next step shortly after someone finishes selecting an answer (about half a second later).
- Works for common single-answer types such as Single Choice, Dropdown, Yes/No, Likert, NPS, Rating, Language Selector, and State/Province when shown as a single choice or dropdown
- If the answer is Other, the respondent still needs to fill in the specify text before the survey advances
- Questions that allow multiple answers, Matrix grids, text questions, and other complex types still require Next
- The last step never auto-submits — respondents always confirm Submit themselves
Auto-advance is off by default, so existing surveys behave as they did before.
Save & continue later
Turn on Save & continue later when people might leave a long survey and come back. Respondents email or text themselves a secure resume link (7-day expiry). Channels follow your package (email distribution, SMS distribution). Customize the email under Email → Templates → Survey Save & Continue.
Full setup: Save & Continue Later.
Check survey health before you launch
While you build, open Survey health in the top bar (to the left of Tools) for a live checklist of logic issues, privacy reminders, completion-time estimates, and design suggestions. Click any finding to jump to the related question or logic rule.
See Survey Health for what each group checks, how severity works, and what your subscription includes.
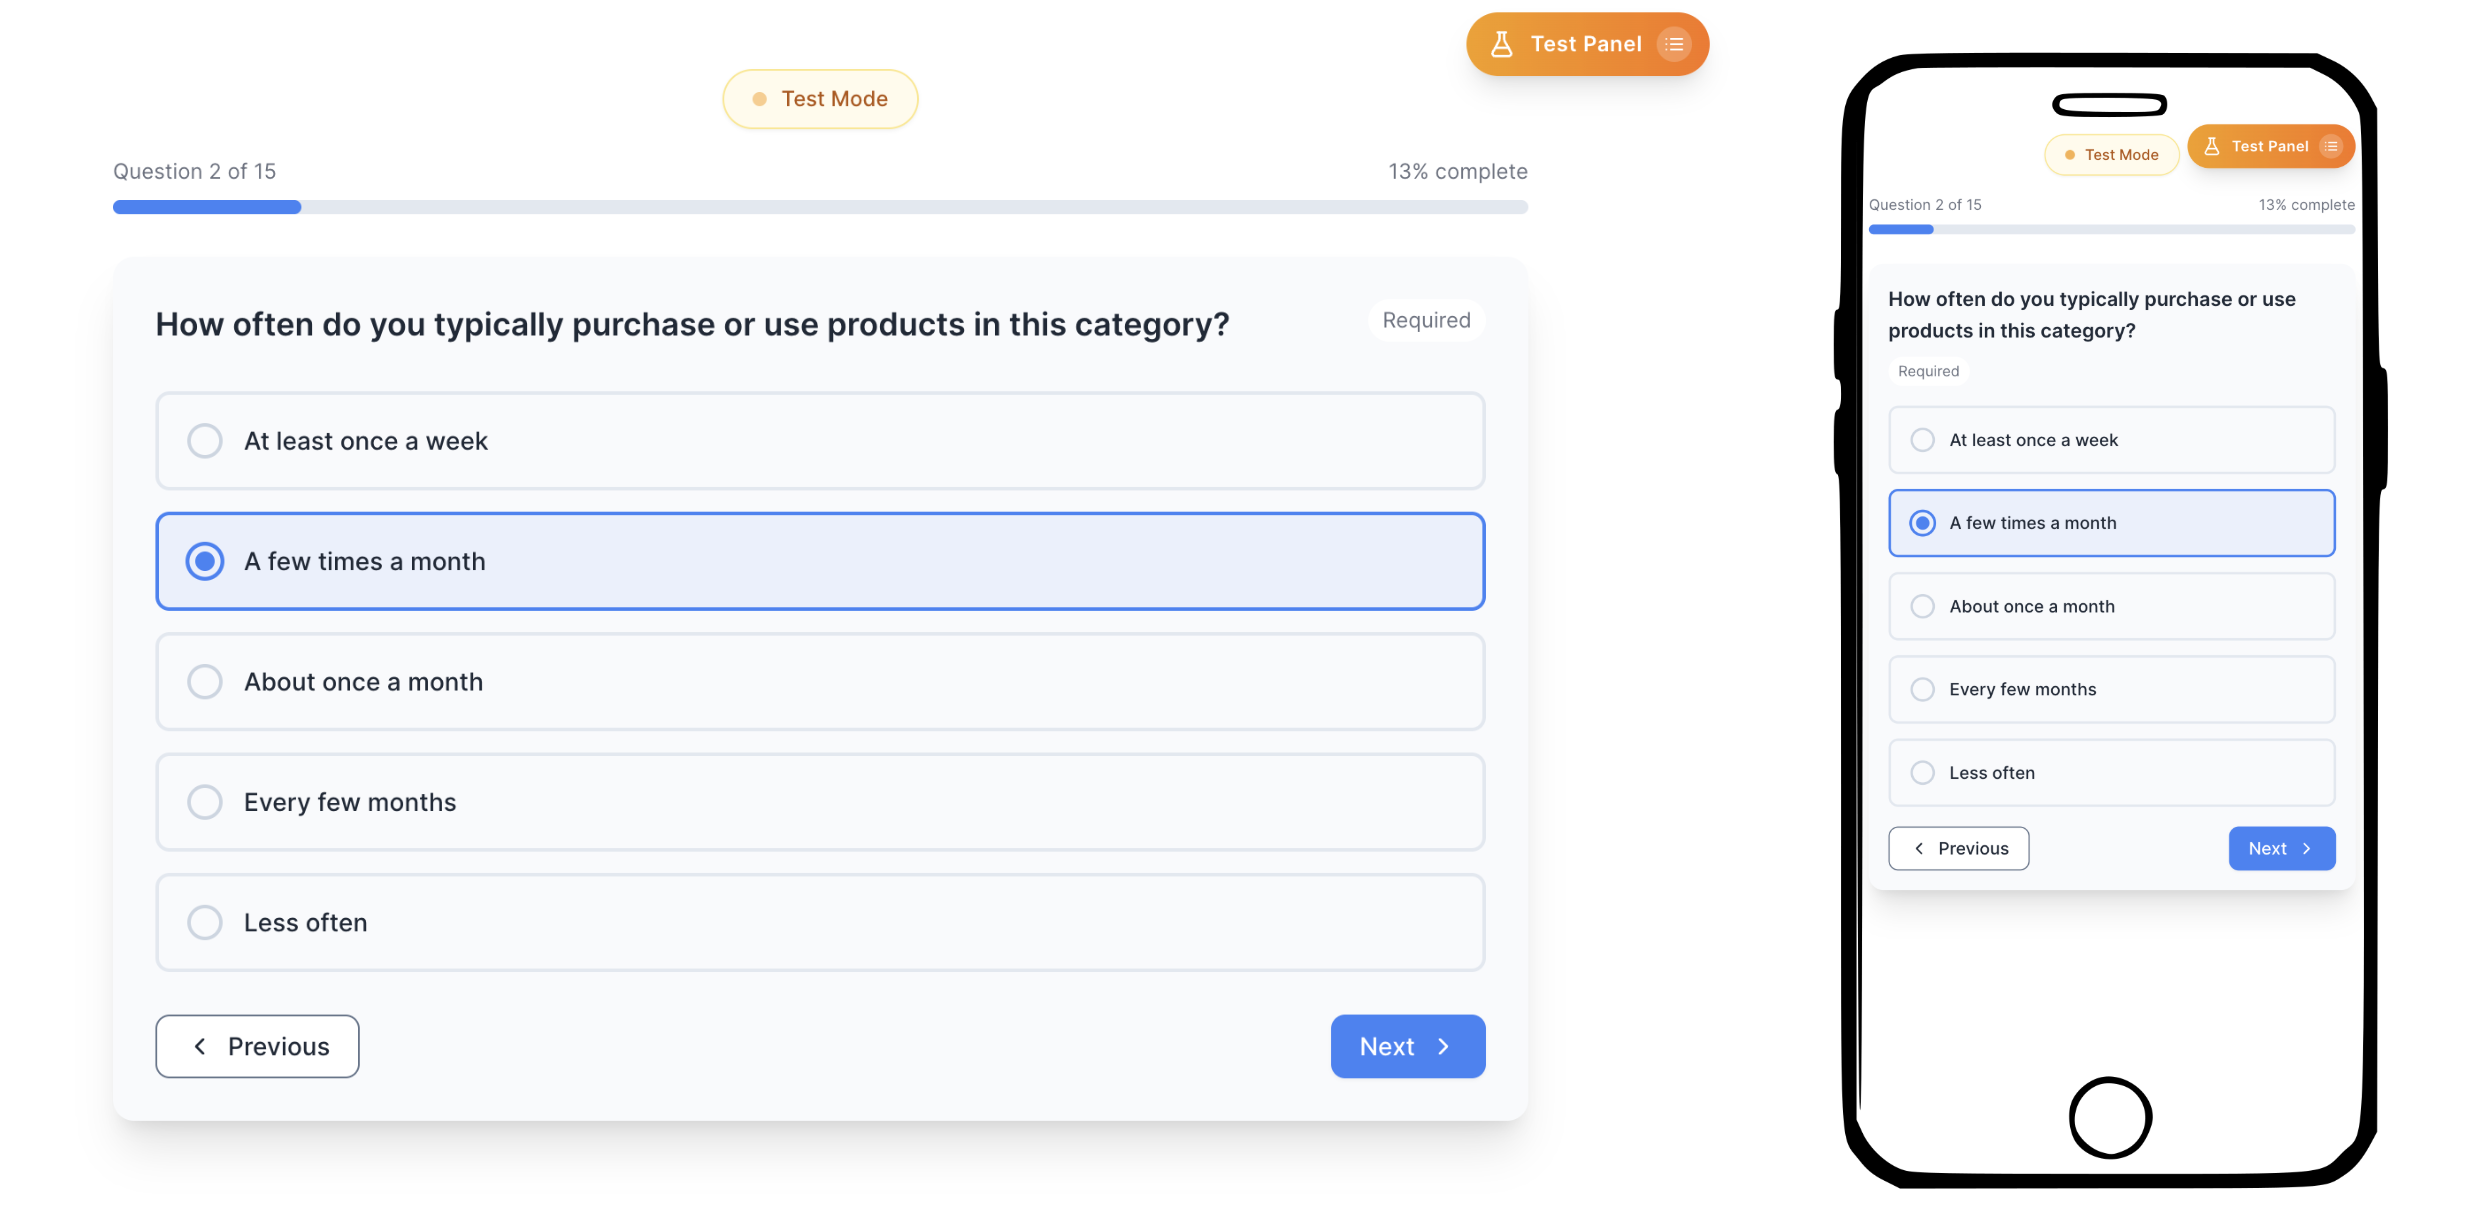
Previewing Your Survey
Always preview before distributing!
Click Test Survey button in the top right of the survey builder screen.
Test on different devices:
- Desktop view
- Tablet view
- Mobile view
Complete the survey as a respondent would
Check that skip logic works correctly
Warning
Always test your survey's logic paths before going live. Preview mode lets you test without recording responses.
Tip
If your team reviews surveys together, use Survey Team Collaboration to leave structured feedback on specific questions during test mode and manage issues in the Feedback Inbox without leaving the builder.
Next Steps
Now that you've created a survey, learn about:
- Question Types - Explore all available question types
- Carousel - Evaluate concepts one at a time in a guided flow
- Swipe Cards - Swipe or tap through products, brands, or concepts
- Survey Health - Review completion time, logic, privacy, and design suggestions in the builder
- Survey Logic & Branching - Add conditional logic, including skip to a section
- Persistent Content - Keep a concept on screen through a section
- Save & Continue Later - Let respondents resume by email or text
- Distributing Surveys - Share your survey
- Survey Analytics - Analyze responses
- Open-End Coding Studio - Auto-code open-ended responses with AI-assisted workflows
- Survey Team Collaboration - Leave QA feedback during test mode and manage issues in the builder